Showing posts with label collection 2000. Show all posts

Monday, 29 August 2011

One Day fotd

Hiya everyone!

Today, my best friend and I went to the cinema to go see One Day. I loved the movie, but a word of advice :if you someone who very easily cries at movies, be prepared for this. I was still sniffing when the credits rolled! I just have too many feelings, I reckon.

Anyway, true to my promise in my Sleek Saturday post, I decided to try pink and gold out together.


I was getting quite hacked off at how you can't actually see my eye makeup when I'm looking at the camera! It made all the normal shots look bad and got me quite annoyed; I think I need to experiment a bit more with my eye makeup technique!


See?! You can only see my eye makeup when I'm looking down. Anyway, on to the actual products. For my eyemakeup, I used Pink Punch from the Sleek Good Girl Palette and my trusty gold, Half Baked by Urban Decay. For eyeliner, I didn't go with Maybelline (for once!) and instead used Shadowline by Frontcover and the black from the Sleek Sunset palette. As for Mascara, I used a sample of the new Clarins mascara that you get redeemed by showing this card you get in September's Glamour (if that's not a reason to get it, you also get a free makeover!) and Clinique High Impact.

My face routine is the same as usual with Benefit Boo-ing concealer and the Collection 2000 one. My blush is L'Oreal True Match in Rosewood, I think. And I used Sleek Pout Paints in Milkshake and Pinkini for my lips.


I love this combination and will be using it more often, perhaps with other shades from the Good Girl palette. I'm really glad I did Sleek Saturday because it's helped me use my Good Girl palette more instead of leaving it abandoned. Now to do the same with the rest of my palettes!

What do you girls think of this look? And does anyone else have that problem with typical fotd poses not showing your eye makeup? xx


Friday, 15 April 2011

My take on Cosmopolitan's 'everyday sexy' eyes

For those of you that read Cosmo (and that got this month's issue with Kim Kardashian - UK version, just to clarify), you've probably seen this in the magazine. 


I liked the look of this, so I decided to try it out. After trying it a couple of days ago, I thought I'd attempt to do a tutorial of sorts, but not really a tutorial, rather more like my way of doing this. First of all, I decided to do it with lighter browns and tweak a few things, but of course, you can just follow the steps in the magazine. I'll be adding what Cosmo wrote for each step in italics, because it can be a bit tricky to read that tiny writing!

Froncover Mermaid Dreams palette, Natural Collection eyeshadow in Milk Chocolate, Maybelline Colossal Volume mascara, Collection 2000 Big Fake mascara, Shu Uemura eyelash curler, Urban Decay 24/7 Liner in Bourbon
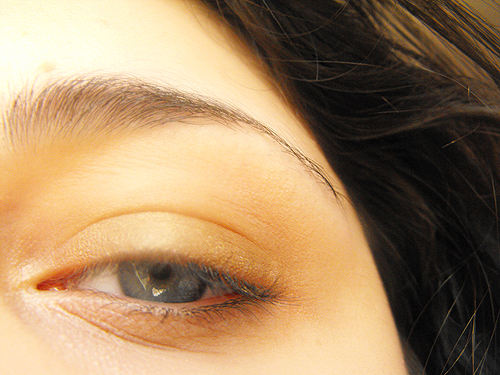
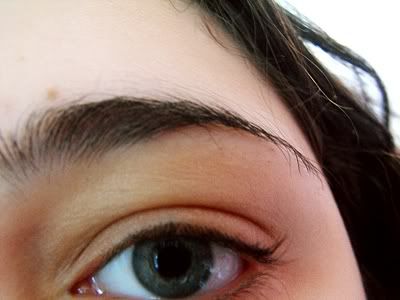
Naked eye
A quick note before I start, my photos seem a bit blurred at some points, which I didn't notice whilst taking these pictures. It's probably due to my camera lens possibly being a bit smudged, so sorry bout that! 

Step One:
"'Sexy = dewy, so avoid matt eyeshadow on the eyelid', says Kay. 'Press a silky brown eyeshadow all over the lid to just above the crease.' Using your fingers helps flatten the powder and make sit more reflective."

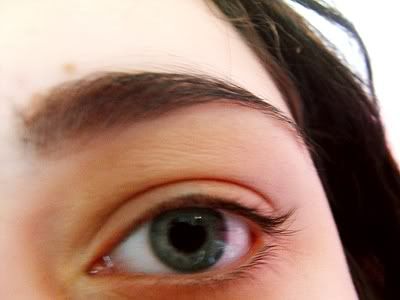
For this step, I used my Frontcover Mermaid Dreams palette. So baked eyeshadow isn't the same as silky, I felt like using this palette. To start with, I used Baked Bronze. 


Then I decided it was shimmery enough for me, so I used Sunray over it to give it a bit more oomph.


When I was trying to photograph it, it isn't very visible on my eyelid, but I followed the instructions from the magazine, so there isn't that much to miss.
Step Two:
"Using a small, fluffly brush, swirl a dark matt brown eyeshadow where your eye naturally creases. 'Don't take the colour too far inwards - it's all about trying to widen the eye', says Kay.
Again, I didn't really pay attention to the colour choice. I decided to go with a medium brown instead of dark, as dark colours can look really harsh against my colour. I used Natural Collection's Milk Chocolate £1,79, I believe, but you can get 3 for £5 on NC's stuff at Boots at the moment!

 
Step Three:
 "'Brown pencil has the same impact as black but is much more flattering.', says Kay. Run brown eyeliner all along the upper lashline. 'You can apply a little on the lower lashes too if you have almond-shaped eyes, but don't do this if your eyes are very round.' 
Add a few extra dots of pencil on the outer corners to give a thicker edge. 'Finish the line at the last lash, not beyond on the skin,' says Kay."
Another rather simple step, I used my Urban Decay eyeliner in Bourbon.


As with everything else, I toned this down a bit, as although they say it's everyday, I feel their version is a bit more suited to nights, so I made it all a little lighter and subtler.

Step Four:
"For lovely thick lashes, use a finer mascara and apply a few layers, rather than using a thickening formula, which is likely to clump. 'You need to ensure there are no gaps,' says Kay,'so look straight ahead in the mirror and zigzag the mascara from root to tip, holding the wand vertically if you need to.'"
So this step I completely disregarded, as I have my own way of applying mascara to get a not bad result.

I used my Maybelline mascara and my recently-bought Collection 2000 Big Fake one, which everyone and their mum has been raving about.

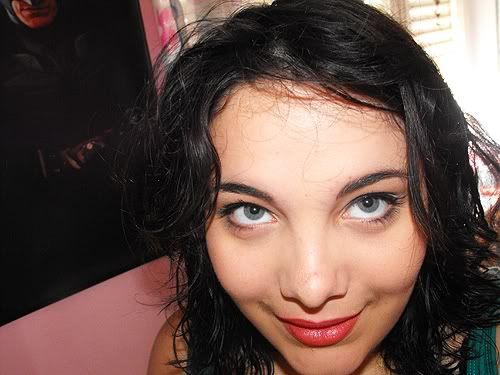
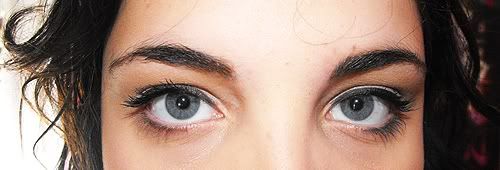
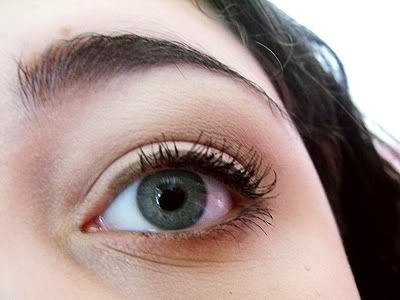
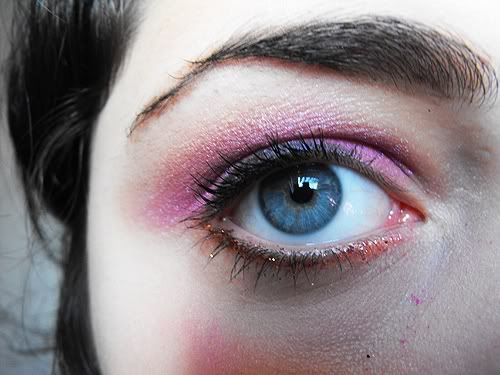
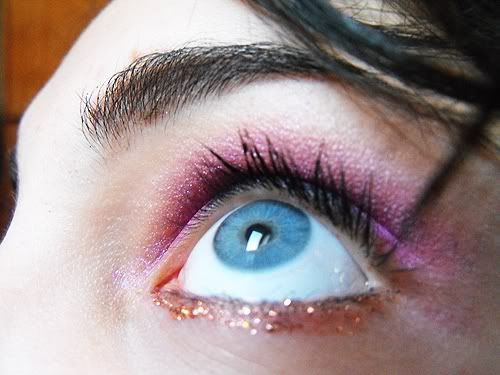
So the final result....
The final result actually looks nothing like in the magazine, but I quite like it as it's an easy, simple eye makeup that doesn't require liquid eyeliner.


As for the rest of my face, I used Natural Collection's lipstick in Rose Bud (when I first read it I thought it said Rose Dud!) £1.99 and my Sephora cream palette, which I just use for the blush.

I hope you guys like this and if in the future, I do a tutorial, I will try and get some decent eye shots!

Wednesday, 15 September 2010

FOTD

First of all, wow four new followers! Thank you :D And now, moving on to the post, my first post actually only consisting of a FOTD and I'm gonna list all the products I used.


My hair's still quite wet, I was too impatient to let it dry. And wow, I actually used foundation for once, I ought to start using some products up...
Anyway, products...


Face:
17 Hide & Chic Anti Fatigue Foundationin Soft Ivory
Garnier 2 in 1 Tinted Eye Roll-On in Fair
Rimmel Stay Matte Pressed Powder in Transparent (hit the pan on this one)
New York Color Color Wheel Mosaic Face Powder in Mocha Glow (727)


Eyes:
Benefit Brow-zings in Medium
UDPP in Eden
Zoeva Nude Palette
Sleek Ink Pot Gel Liner
Diorshow Iconic


Lips:
Collection 2000 Lipstick in 53
(I think it's discontinued or repackaged as it doesn't look anything like the current ones)


So that's it for my FOTD :) And now for a random picture, this is my cat Coco sleeping. Isn't she cute? <3


Thursday, 19 August 2010

Eyebrows, such pesky things...

Until recently, I never really cared much about my eyebrows. Ok, yeah, I pluck 'em, but filling them in? Neatening them? Never. Until I read this post by the marvelous Beauty's Bad Habit
(love that blog, it's amazing!) and realised :'Oh, my eyebrows are crazy and untamed. I better get them sorted out'.

See that's where my problem is. I can't just buy an eyeliner pencil. Black? I'll look like a transvestite. So in reality, I have no clue what to buy.

Anyway, here's a picture of my untamed and completely make up free eyebrow.


Urgh, nasty, isn't it?

So last week, I went into Sephora with €30 and was immediately asked by a MUA standing near the Benefit and Urban Decay stuff whether I needed help, which I did. I said I did and that I wanted some eyebrow powder which would make my eyebrows look natural and not wayy too dramatic. So she immediately showed me the Benefit Brow-zings and then ent and looked for an angled brush so she could show me how to apply it (turns out someone had stolen one from the tester's box). Then she showed me how to use it and she made my eyebrows look quite good so I decided to buy it.

€29. Pricey stuff, but I suppose in the long run, it's worth it. And the Make Up Alley reviews of it seem impressive, so I'm happy.

Now this is how I've decided to do my brows, after some experimenting over the last week.


As the picture's slightly blurred, I've decided I'll just post a pic of my look today, where you can see my eyebrow more clearly.


Today I used Too Faced's Natural Eye Palette doing the Day look, which I really really loove :D

And now for yesterday's look, which is actually a recreation of this lovely look I saw in a very old Sugar magazine I used to have lying around, which I still remembered (at least the basics I remembered)


Yeah, you can see a bit of the fallout on my cheek there, whoopsy. I used Barry M Peony, Sleek Ink Pot and Collection 2000 Glam Crystals Dazzling Gel Liner in Retro Chic.


So that's all from me today, it's getting late and I'm getting tired :) Night night